
Published · By Henry Palma
How to Create a Ticketed Event in Sweet Studio
Once an event is Active, customers can buy a ticket from their Sweet Studio portal. Here is how to set the name, time, price, cover, and Lead/Follow limits.
Once you mark an event Active in Sweet Studio, customers can buy a ticket from their portal. An optional cover image appears on the event listing in that portal, and each ticket gets its own QR code for door check-in.
This walkthrough follows the in-app Guide section "I want to create a ticketed event," plus the field labels on the real New event form. It is about a one-night ticketed event, not a multi-week program.
What customers see in their portal
Customers buy the ticket themselves. They do not need to message the front desk or pay at the door.
If you upload a cover, the Guide says it appears on the event listing in the customer portal. The New event form is more specific: the cover is "Displayed on schedule cards in the customer portal."
If you enable Lead/Follow booking, customers see a Lead / Follow toggle before they buy a ticket. That comes from the Guide section on offering Lead/Follow role booking for a class or event.
After the purchase, each ticket has its own QR code that staff can use at the door.
Why ticketed events help studio owners
A social, workshop, or showcase can be sold in advance, with a set price and time, from the same portal customers already use for classes.
You can set an optional capacity and check "Enforce capacity (mark Sold Out and block purchases once full)" so sales stop when the room is full. For a partner-dance night, you can cap Lead spots and Follow spots separately so the floor stays balanced.
If you run a similar night later, Clone opens a new form already filled in, cover photo included, so you only need to change the date.
The customer journey
- The customer opens your studio's customer portal.
- They find the event on the event listing and schedule cards, with the optional cover if you added one.
- If Lead/Follow booking is on, they choose Lead or Follow, then buy a ticket.
- The ticket includes a QR code for door check-in.
How to set up a ticketed event
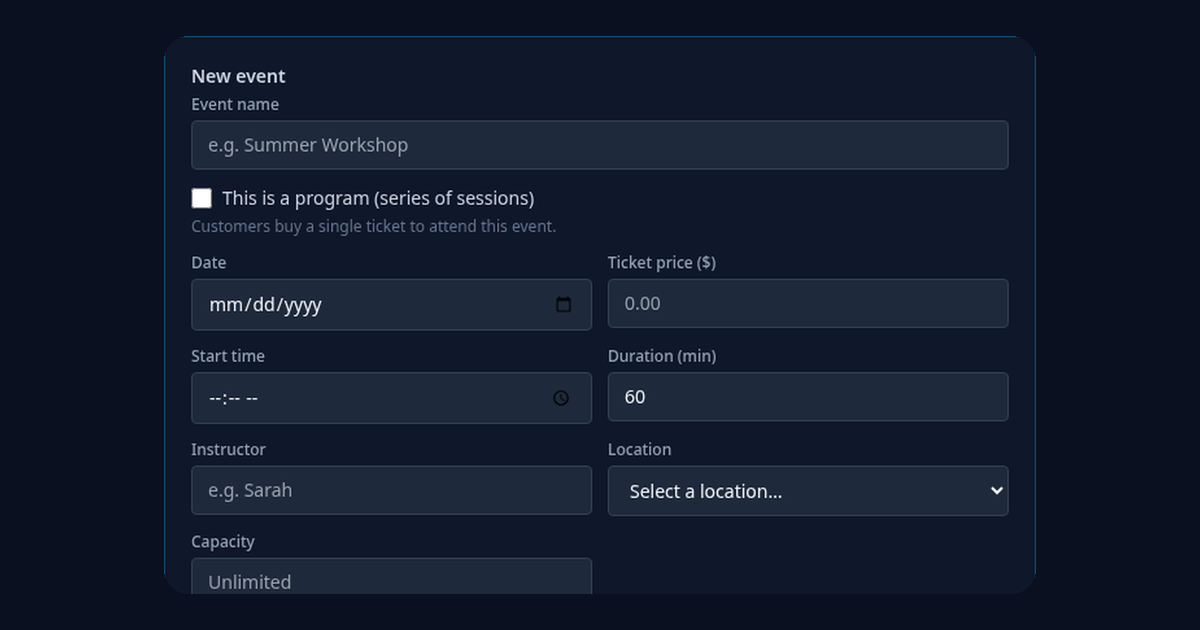
- In the owner portal, under Sell, open Events, then click + New event.
- Leave This is a program (series of sessions) unchecked. The form then says "Customers buy a single ticket to attend this event."
3. Fill in the event details: - Event name - Date - Start time - Duration (min), which defaults to 60 - Instructor, optional - Location - Ticket price ($) - Capacity, optional. Check Enforce capacity (mark Sold Out and block purchases once full) if you want the limit enforced.
- Add an optional Description. Under Cover image (optional), click Upload image. The form recommends a square image, at least 400 × 400 px, and says it is displayed on schedule cards in the customer portal.
- For a partner-dance event, check Enable Lead / Follow booking, then set Lead spots and Follow spots. The form notes that Lead + Follow spots should equal the total capacity, and that changing capacity will reset the split evenly. You can also check Set different prices for Lead/Follow if the two roles should cost different amounts.
- Mark it Active. The Guide says customers can then buy a ticket from their portal, and each ticket gets its own QR code for door check-in.
- Need a similar event later? Click Clone on an existing one. The Guide says the form opens pre-filled, cover photo included, so you only need to change the date.
When the form is ready, use Save changes. Use Cancel if you were only reviewing the fields and do not want to keep them.
A practical close
Set the night up once, mark it Active, and let customers buy tickets from their portal.
Visit sweetstudio.app.
No monthly fee. Pay only when you make a sale.